libnice 0.1.4 released!

Hey everyone,

I have just released a new version of libnice, the NAT traversal library.

Version 0.1.4 has a few bug fixes but the major changes are the addition of an SDP parsing and generation API.

You can now more easily generate your credentials and candidates and parse them with a single API call, making it much easier to exchange candidates and establish a successful connection.

Also, I have added three examples to the examples/ subdirectoy from the libnice source tree. Those examples should help anyone learn how to use libnice and what to do in order to establish a successful connection.

The first example, simple-example.c will create a new agent, and gather its candidates and print out a single line to paste on the peer. It uses the signals to asynchronously wait for events and continue the code execution.

The second example, threaded-example.c, will run the mainloop on the main thread and do everything else sequentially in another thread, waiting for signals to release the libnice thread to continue processing.

The final example, sdp-example.c, is based on the threaded example but uses the new SDP generate/parsing API to generate the candidates and credentials line to exchange between the two instances. It will base64 the SDP to make it all fit into a single line, making it easier to exchange the SDP between clients without having to parse the multi-line SDP in the example, keeping it small and concise.

I hope you will find this release useful, let me know if you have any comments.

You can get the latest version here and the documentation has been updated here.

KaKaRoTo

UVC H264 Encoding cameras support in GStreamer

More and more people are doing video conferencing everyday, and for that to be possible, the video has to be encoded before being sent over the network. The most efficient and most popular codec at this time is H264, and since the UVC (USB Video Class) specification 1.1, there is support for H264 encoding cameras.

One such camera is the Logitech C920. A really great camera which can produce a 1080p H264-encoded stream at 30 fps.  As part of my job for Collabora, I was tasked to add support for such a camera in GStreamer. After months of work, it’s finally done and has now been integrated upstream into gst-plugins-bad 0.10 (port to GST 1.0 pending).

One important aspect here is that when you are capturing a high quality, high resolution H264 stream, you don’t want to be wasting your CPU to decode your own video in order to show a preview window during a video chat, so it was important for me to be able to capture both H264 and raw data from the camera. For this reason, I have decided to create a camerabin2-style source: uvch264_src.

Uvch264_src is a source which implements the GstBaseCameraSrc API. This means that instead of the traditional ‘src’ pad, it provides instead three distinct source pads: vidsrc, imgsrc and vfsrc. The GstBaseCameraSrc API is based heavily on the concept of a “Camera” application for phones. As such, the vidsrc is meant as a source for recording video, imgsrc as a source for taking a single-picture and vfsrc as a source for the viewfinder (preview) window. A ‘mode’ property is used to switch between video-mode and image-mode for capture. The uvch264_src source only supports video mode however, and the imgsrc will never be used.

When the element goes to PLAYING, only the vfsrc will output data, and you have to send the “start-capture” action signal to activate the vidsrc/imgsrc pads, and send the “stop-capture” action signal to stop capturing from the vidsrc/imgsrc pads. Note that vfsrc will be outputting data when in PLAYING, so it must always be linked (link it to fakesink if you don’t need the preview, otherwise you’ll get a not-linked error). If you want to test this on the command line (gst-launch) you can set the ‘auto-start’ property to TRUE and the uvch264_src will automatically start the capture after going to PLAYING.

You can request H264, MJPG, and raw data from the vidsrc, but only MJPG and raw data from the vfsrc. When requesting H264 from the vidsrc, then the max resolution for the vfsrc will be 640×480, which can be served as jpg or as raw (decoded from jpg). So if you don’t want to use any CPU for decoding, you should ask for a raw resolution lower than 432×240 (with the C920) which will directly capture YUV from the camera. Any higher resolution won’t be able to go through the usb’s bandwidth and the preview will have to be captured in mjpg (uvch264_src will take care of that for you).

The source has two types of controls, the static controls which must be set in READY state, and DYNAMIC controls which can be dynamically changed in PLAYING state. The description of each property will specify whether that property is a static or dynamic control, as well as its flags. Here are the supported static controls : initial-bitrate, slice-units, slice-mode, iframe-period, usage-type, entropy, enable-sei, num-reorder-frames, preview-flipped and leaky-bucket-size. The dynamic controls are : rate-control,  fixed-framerate, level-idc, peak-bitrate, average-bitrate, min-iframe-qp,  max-iframe-qp, min-pframe-qp,  max-pframe-qp, min-bframe-qp,  max-bframe-qp, ltr-buffer-size and ltr-encoder-control.

Each control will have a minimum, maximum and default value, and those are specific to each camera and need to be probed when the element is in READY state. For that reason, I have added three element actions to the source in order to probe those settings : get-enum-setting, get-boolean-setting and get-int-setting.
These functions will return TRUE if the property is valid and the information was successfully retrieved, or FALSE if the property is invalid (giving an
invalid name or a boolean property to get_int_setting for example) or if the camera returned an error trying to probe its capabilities.
The prototype of the signals are :

  • gboolean get_enum_setting (GstElement *object, char *property, gint *mask, gint *default);
    Where the mask is a bit field specifying which enums can be set, where the bit being set is (1 << enum_value).
    For example, the ‘slice-mode’ enum can only be ignored (0) or slices/frame (3), so the mask returned would be : 0x09
    That is equivalent to (1 << 0 | 1 << 3) which is :
    (1 << UVC_H264_SLICEMODE_IGNORED) | (1 << UVC_H264_SLICEMODE_SLICEPERFRAME)
  • gboolean get_int_setting (GstElement *object, char *property, gint *min, gint *def, gint *max);
    This one gives the minimum, maximum and default values for a property. If a property has min and max to the same value, then the property cannot be changed, for example the C920 has num-reorder-frames setting: min=0, def=0 and max=0, and it means the C920 doesn’t support reorder frames.
  • gboolean get_boolean_setting (GstElement *object, char *property, gboolean *changeable, gboolean *default_value);
    The boolean value will have changeable=TRUE only if changing the property will have an effect on the encoder, for example, the C920 does not support the preview-flipped property, so that one would have changeable=FALSE (and default value is FALSE in this case), but it does support the enable-sei property so that one would have changeable=TRUE (with a default value of FALSE).

This should give you all the information you need to know which settings are available on the hardware, and from there, be able to control the properties
that are available.

Since these are element actions, they are called this way :

gboolean return_value, changeable, default_bool;
gint mask, minimum, maximum, default_int, default_enum;

g_signal_emit_by_name (G_OBJECT(element), "get-enum-setting", "slice-mode", &mask, &default_enum, &return_value, NULL);
g_signal_emit_by_name (G_OBJECT(element), "get-boolean-setting", "enable-sei", &changeable, &default_bool, &return_value, NULL);
g_signal_emit_by_name (G_OBJECT(element), "get-int-setting", "iframe-period", &minimum, &default_int &maximum, &return_value, NULL);

Apart from that, the source also supports the GstForceKeyUnit video event for dynamically requesting keyframes, as well as custom-upstream events to control LTR (Long-Term Reference frames), bitrate, QP, rate-control and level-idc, through, respectively, the uvc-h264-ltr-picture-control, uvc-h264-bitrate-control, uvc-h264-qp-control, uvc-h264-rate-control and uvc-h264-level-idc custom upstream events (read the code for more information!). The source also supports receiving the ‘renegotiate’ custom upstream event which will make it renegotiate the according to the caps on its pads. This is useful if you want to enable/disable h264 streaming or switch resolution/framerate easily while the pipeline is running; Simply change your caps and send the renegotiate event.

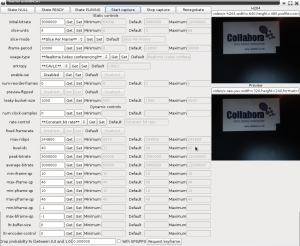
I have written a GUI test application which you can use to test the camera and the source’s various features. It can also serve as a reference implementation on how the source can be used. The test application resides in gst-plugins-bad, under tests/examples/uvch264/ (make sure to run it from its source directory though).

uvch264_src test application (click to enlarge)

You can also use this example gst-launch pipeline for testing the capture of the camera. This will capture a small preview window as well as an h264 stream in 1080p that will be decoded locally :

gst-launch uvch264_src device=/dev/video1 name=src auto-start=true src.vfsrc ! queue ! “video/x-raw-yuv,width=320,height=240,framerate=30/1” ! xvimagesink src.vidsrc ! queue ! video/x-h264,width=1920,height=1080,framerate=30/1,profile=constrained-baseline ! h264parse ! ffdec_h264 ! xvimagesink

That’s about it. If you are interested in using uvch264_src to capture from one of the UVC H264 encoding cameras, make sure you upgrade to the latest git versions of gstreamer, gst-plugins-base, gst-plugins-good and gst-plugins-bad (or 0.10.37+ for gstreamer/gst-plugins-base, 0.10.32 for gst-plugins-good and 0.10.24 for gst-plugins-bad, whenever those versions get released).

I would like to thank Collabora and Cisco for sponsoring me to work on this great project, it couldn’t have been possible without them!

If you have any more questions about this subject, feel free to contact me.

Enjoy!

How the ECDSA algorithm works

To popular demand, I have decided to try and explain how the ECDSA algorithm works. I’ve been struggling a bit to understand it properly and while I found a lot of documentation about it, I haven’t really found any “ECDSA for newbies” anywhere. So I thought it would be good to explain in simple terms how it works so others can learn from my research. I have found some websites that explain the basic principles but nowhere near enough to actually understand it, others that explains things without any basics, making it incomprehensible, and others that go way too deep into the the mathematics behind it.

ECDSA stands for “Elliptic Curve Digital Signature Algorithm”, it’s used to create a digital signature of data (a file for example) in order to allow you to verify its authenticity without compromising its security. Think of it like a real signature, you can recognize someone’s signature, but you can’t forge it without others knowing. The ECDSA algorithm is basically all about mathematics.. so I think it’s important to start by saying : “hey kids, don’t slack off at school, listen to your teachers, that stuff might be useful for you some day!” 🙂 But these maths are fairly complicated, so while I’ll try to vulgarize it and make it understandable for non technical people, you will still probably need some knowledge in mathematics to understand it properly. I will do this in two parts, one that is a sort of high level explanation about how it works, and another where I dig deeper into its inner workings to complete your understanding. Note however that I’ve just recently learned this stuff, so I’m definitely not an expert on the matter.

So the principle is simple, you have a mathematical equation which draws a curve on a graph, and you choose a random point on that curve and consider that your point of origin. Then you generate a random number, this is your private key, you do some magical mathematical equation using that random number and that “point of origin” and you get a second point on the curve, that’s your public key. When you want to sign a file, you will use this private key (the random number) with a hash of the file (a unique number to represent the file) into a magical equation and that will give you your signature. The signature itself is divided into two parts, called R and S. In order to verify that the signature is correct, you only need the public key (that point on the curve that was generated using the private key) and you put that into another magical equation with one part of the signature (S), and if it was signed correctly using the the private key, it will give you the other part of the signature (R). So to make it short, a signature consists of two numbers, R and S, and you use a private key to generate R and S, and if a mathematical equation using the public key and S gives you R, then the signature is valid. There is no way to know the private key or to create a signature using only the public key.

Alright, now for the more in depth understanding, I suggest you take an aspirin right now as this might hurt! 😛

Let’s start with the basics (which may be boring for people who know about it, but is mandatory for those who don’t) : ECDSA uses only integer mathematics, there are no floating points (this means possible values are 1, 2, 3, etc.. but not 1.5..),  also, the range of the numbers is bound by how many bits are used in the signature (more bits means higher numbers, means more security as it becomes harder to ‘guess’ the critical numbers used in the equation), as you should know, computers use ‘bits’ to represent data, a bit is a ‘digit’ in binary notation (0 and 1) and 8 bits represent one byte. Every time you add one bit, the maximum number that can be represented doubles, with 4 bits you can represent values 0 to 15 (for a total of 16 possible values), with 5 bits, you can represent 32 values, with 6 bits, you can represent 64 values, etc.. one byte (8 bits) can represent 256 values, and 32 bits can represent 4294967296 values (4 Giga).. Usually ECDSA will use 160 bits total, so that makes… well, a very huge number with 49 digits in it…

ECDSA is used with a SHA1 cryptographic hash of the message to sign (the file). A hash is simply another mathematical equation that you apply on every byte of data which will give you a number that is unique to your data. Like for example, the sum of the values of all bytes may be considered a very dumb hash function. So if anything changes in the message (the file) then the hash will be completely different. In the case of the SHA1 hash algorithm, it will always be 20 bytes (160 bits). It’s very useful to validate that a file has not been modified or corrupted, you get the 20 bytes hash for a file of any size, and you can easily recalculate that hash to make sure it matches. What ECDSA signs is actually that hash, so if the data changes, the hash changes, and the signature isn’t valid anymore.

Now, how does it work? Well Elliptic Curve cryptography is based on an equation of the form :

y^2 = (x^3 + a * x + b) mod p

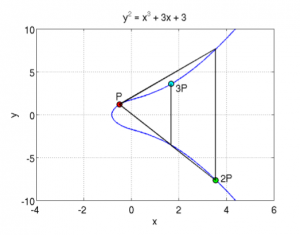
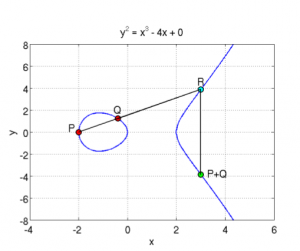
First thing you notice is that there is a modulo and that the ‘y‘ is a square. This means that for any x coordinate, you will have two values of y and that the curve is symmetric on the X axis. The modulo is a prime number and makes sure that all the values are within our range of 160 bits and it allows the use of “modular square root” and “modular multiplicative inverse” mathematics which make calculating stuff easier (I think). Since we have a modulo (p) , it means that the possible values of y^2 are between  0 and p-1, which gives us p total possible values. However, since we are dealing with integers, only a smaller subset of those values will be a “perfect square” (the square value of two integers), which gives us N possible points on the curve where N < p (N being the number of perfect squares between 0 and p). Since each x will yield two points (positive and negative values of the square-root of y^2), this means that there are N/2 possible ‘x‘ coordinates that are valid and that give a point on the curve. So this elliptic curve has a finite number of points on it, and it’s all because of the integer calculations and the modulus. Another thing you need to know about Elliptic curves, is the notion of “point addition“. It is defined as adding one point P to another point Q will lead to a point S such that if you draw a line from P to Q, it will intersect the curve on a third point R which is the negative value of S (remember that the curve is symmetric on the X axis). In this case, we define R = -S to represent the symmetrical point of R on the X axis. This is easier to illustrate with an image : So you can see a curve of the form y^2 = x^3 + ax + b (where a = -4 and b = 0), which is symmetric on the X axis, and where P+Q is the symmetrical point through X of the point R which is the third intersection of a line going from P to Q. In the same manner, if you do P + P,  it will be the symmetrical point of R which is the intersection of the line that is a tangent to the point P.. And P + P + P is the addition between the resulting point of P+P with the point P since P + P + P can be written as (P+P) + P.. This defines the “point multiplication” where k*P is the addition of the point P to itself k times… here are two examples showing this :  
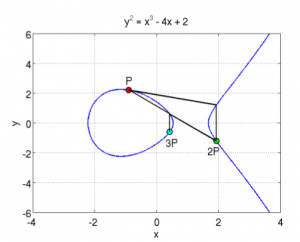
Here, you can see two elliptic curves, and a point P from which you draw the tangent, it intersects the curve with a third point, and its symmetric point it 2P, then from there, you draw a line from 2P and P and it will intersect the curve, and the symmetrical point is 3P. etc… you can keep doing that for the point multiplication. You can also already guess why you need to take the symmetric point of R when doing the addition, otherwise, multiple additions of the same point will always give the same line and the same three intersections.

One particularity of this point multiplication is that if you have a point R = k*P, where you know R and you know P, there is no way to find out what the value of ‘k‘ is. Since there is no point subtraction or point division, you cannot just resolve k = R/P. Also, since you could be doing millions of  point additions, you will just end up on another point on the curve, and you’d have no way of knowing “how” you got there. You can’t reverse this operation, and you can’t find the value ‘k‘ which was multiplied with your point P to give you the resulting point R.

This thing where you can’t find the multiplicand even when you know the original and destination points is the whole basis of the security behind the ECDSA algorithm, and the principle is called a “trap door function“.

Now that we’ve handled the “basics”, let’s talk about the actual ECDSA signature algorithm. For ECDSA, you first need to know your curve parameters, those are a, b, p, N and G. You already know that ‘a‘ and ‘b‘ are the parameters of the curve function (y^2 = x^3 + ax + b), that ‘p‘ is the prime modulus,  and that ‘N‘ is the number of points of the curve, but there is also ‘G‘ that is needed for ECDSA, and it represents a ‘reference point’ or a point of origin if you prefer. Those curve parameters are important and without knowing them, you obviously can’t sign or verify a signature. Yes, verifying a signature isn’t just about knowing the public key, you also need to know the curve parameters for which this public key is derived from.

So first of all, you will have a private and a public key.. the private key is a random number (of 20 bytes) that is generated, and the public key is a point on the curve generated from the point multiplication of G with the private key. We set ‘dA‘ as the private key (random number) and ‘Qa‘ as the public key (a point), so we have : Qa = dA * G (where G is the point of reference in the curve parameters).

So how do you sign a file/message ? First, you need to know that the signature is 40 bytes and is represented by two values of 20 bytes each, the first one is called R and the second one is called S.. so the pair (R, S) together is your ECDSA signature.. now here’s how you can create those two values in order to sign a file.. first you must generate a random value ‘k‘ (of 20 byes), and use point multiplication to calculate the point P=k*G. That point’s x value will represent ‘R‘. Since the point on the curve P is represented by its (x, y) coordinates (each being 20 bytes long), you only need the ‘x‘ value (20 bytes) for the signature, and that value will be called ‘R‘. Now all you need is the ‘S‘ value.

To calculate S, you must make a SHA1 hash of the message, this gives you a 20 bytes value that you will consider as a very huge integer number and we’ll call it ‘z‘. Now you can calculate S using the equation :

S = k^-1 (z + dA * R) mod p

Note here the k^-1 which is the ‘modular multiplicative inverse‘ of k… it’s basically the inverse of k, but since we are dealing with integer numbers, then that’s not possible, so it’s a number such that (k^-1 * k ) mod p is equal to 1. And again, I remind you that k is the random number used to generate R, z is the hash of the message to sign, dA is the private key and R is the x coordinate of k*G (where G is the point of origin of the curve parameters).

Now that you have your signature, you want to verify it, it’s also quite simple, and you only need the public key (and curve parameters of course) to do that. You use this equation to calculate a point P :

P=  S^-1*z*G + S^-1 * R * Qa

If the x coordinate of the point P is equal to R, that means that the signature is valid, otherwise it’s not.

Pretty simple, huh? now let’s see why and how… and this is going to require some mathematics to verify :

We have :

P = S^-1*z*G + S^-1 * R *Qa

but Qa = dA*G, so:

P = S^-1*z*G + S^-1 * R * dA*G = S^-1 (z + dA* R) * G

But the x coordinate of P must match R and R is the x coordinate of k * G, which means that :

k*G = S^-1 (z + dA * R) *G

we can simplify by removing G which gives us :

k = S^-1(z + dA * R)

by inverting k and S, we get :

S = k^-1 (z + dA *R)

and that is the equation used to generate the signature.. so it matches, and that is the reason why you can verify the signature with it.

You can note that you need both ‘k‘ (random number) and ‘dA‘ (the private key) in order to calculate S, but you only need R and Qa (public key) to validate the signature. And since R=k*G and Qa = dA*G and because of the trap door function in the ECDSA point multiplication (explained above), we cannot calculate dA or k from knowing Qa and R, this makes the ECDSA algorithm secure, there is no way of finding the private keys, and there is no way of faking a signature without knowing the private key.

The ECDSA algorithm is used everywhere and has not been cracked and it is a vital part of most of today’s security.

Now I’ll discuss on how and why the ECDSA signatures that Sony  used in the PS3 were faulty and how it allowed us to gain access to their private key.

So you remember the equations needed to generate a signature.. R = k*G and S= k^-1(z + dA*R) mod p.. well this equation’s strength is in the fact that you have one equation with two unknowns (k and dA) so there is no way to determine either one of those. However, the security of the algorithm is based on its implementation and it’s important to make sure that ‘k‘ is randomly generated and that there is no way that someone can guess, calculate, or use a timing attack or any other type of attack in order to find the random value ‘k‘. But Sony made a huge mistake in their implementation, they used the same value for ‘k‘ everywhere, which means that if you have two signatures, both with the same k, then they will both have the same R value, and it means that you can calculate k using two S signatures of two files with hashes z and z’ and signatures S and S’ respectively :

S – S’ = k^-1 (z + dA*R) – k^-1 (z’ + da*R) = k^-1 (z + da*R – z’ -dA*R) = k^-1 (z – z’)

So : k = (z – z’) / (S – S’)

Once you know k, then the equation  for S because one equation with one unknown and is then easily resolved for dA :

dA = (S*k – z) / R

Once you know the private key dA, you can now sign your files and the PS3 will recognize it as an authentic file signed by Sony. This is why it’s important to make sure that the random number used for generating the signature is actually “cryptographically random”.  This is also the reason why it is impossible to have a custom firmware above 3.56, simply because since the 3.56 version, Sony have fixed their ECDSA algorithm implementation and used new keys for which it is impossible to find the private key.. if there was a way to find that key, then the security of every computer, website, system may be compromised since a lot of systems are relying on ECDSA for their security, and it is impossible to crack.

Finally! I hope this makes the whole algorithm clearer to many of you.. I know that this is still very complicated and hard to understand. I usually try to make things easy to understand for non technical people, but this algorithm is too complex to be able to explain in any simpler terms. After all that’s why I prefer to call it the MFET algorithm (Mathematics For Extra Terrestrials) 🙂

But if you are a developer or a mathematician or someone interested in learning about this because you want to help or simple gain knowledge, then I’m sure that this contains enough information for you to get started or to at least understand the concept behind this unknown beast called “ECDSA”.

That being said, I’d like to thank a few people who helped me understand all of this, one particularly who wishes to remain anonymous, as well as the many wikipedia pages I linked to throughout this article, and Avi Kak thanks to his paper explaining the mathematics behind ECDSA, and from which I have taken those graph images aboves.

P.s: In this article, I used ’20 bytes’ in my text to talk about the ECDSA signature because that’s what is usually used as it matches the SHA1 hash size of 20 bytes and that’s what the PS3 security uses, but the algorithm itself can be used with any size of numbers. There may be other inaccuracies in this article, but like I said, I’m not an expert, I just barely learned all of this in the past week.

GstFilters library released!

After the various blog posts about it, and the talk I gave at the GStreamer Conference, there was a lot of interest in the GstFilters library that I’ve been working on. The original plan was for it to get merged into gst-plugins-base, however, it seems like that’s not going to happen. The GStreamer developers would prefer seeing some of its features integrated into the core, but they don’t want the library itself. So I have finally decided to release it as a standalone package so everyone interested can already start using it.

As features from GstFilters will slowly get merged into the core of GStreamer, I will adapt the library to make use of these new features, reducing its internal code. However I believe it is still very useful to have Gstfilters as it’s a very simple library for those who are not familiar with GStreamer. Also the concept of the ‘filters’ is very different from the GstElements because an element can only be added once in a pipeline but filters can be added any number of times in a pipeline (a GstFilter doesn’t represent an actual element, it’s more like a helper function for “create and link these elements for me”). Also the points I’ve made about the steep learning curve and the robustness checks will still be valid even after the Gst core makes dynamic pipeline modifications easier.

GstFilters are now released and will be hosted on freedesktop.org under Farstream’s project. While Farstream users will be the most interested in this library and it is very useful for VoIP/Farstream users, it can also be used for non VoIP applications.

On a similar note, the Farsight-Utils library and API that I presented at the GStreamer Conference has been modified to make it even simpler. The library has been renamed into Farstream-IO since it basically takes care of all the Input/Output to the Farstream conference. The new API is based on a single object now, a FsIoPipeline that you create (which is a subclass of GstPipeline) and to which you register the FsConference/FsSession/FsStream. All the methods from the previous Farsight-Utils classes (FsuConference, FsuSession and FsuStream) will stay the same but will be merged into this single FsIoPipeline class, making everything easier and you’d only need to keep track of a single object.

The FsIo API will be merged into Farstream and released for the next version.

Here is the link to the new GstFilters page : http://www.freedesktop.org/wiki/Software/GstFilters 

And you can get the release tarball from here : http://freedesktop.org/software/farstream/releases/gstfilters/

And browse its documentation here : http://www.freedesktop.org/software/farstream/apidoc/gstfilters/ 


ExpoLibre 2011 in Talca/Chile

Hi all,

About 2 weeks ago, I was in Talca, Chile for the ExpoLibre 2011 conference. It was really awesome, I had one of the best experiences as a speaker!

One of the particularities of that conference, is that it’s organized by the university and its target audience is students, teachers and enthusiasts in open source. The majority of the attendees were not open source developers, but they were people who wanted to learn more about it.
For that reason, this was my very first “motivational talk” rather than my usual technical talks that I’ve given in the past, and I loved it!

Another interesting point was that the audience was mostly speaking Spanish, and not everyone understood English, so I had my colleagues (Reynaldo Verdejo and Thibault Saunier) there to translate what I was saying. That created a very pleasant experience as I had time to relax between each slide while they were translating, and it also made the talk more casual and interactive. I wasn’t nervous for the first time, and it felt great! 🙂

After the talk, I received some very interesting questions and I thoroughly enjoyed answered everyone of them. I saw a lot of people who were interested and I felt like I connected with everyone and I was able to touch them with my ideas. If I was able to change at least one attendee’s perception of open source, and hopefully get them involved in various FLOSS projects, then my mission is a success!

Today, the organizers of the ExpoLibre conference sent me the video recording of my talk, and I’ve shared it on youtube so everyone can listen to what I had stay. I hope everyone enjoys it as much as I enjoyed doing it.

On a final note, I’d like to say that Chile is a beautiful country. I stayed there for almost two weeks, and even though travel from/to Canada is a pain, it was totally worth it! I can’t wait for the next opportunity for me to go there.

Update : Some people complained about the rhythm being broken because of the translation to spanish,  so I asked here for anyone who wants to contribute, to edit the video and crop the non-english sections, so english-only speaking people can view the talk in one constant rhythm/flow without the interruptions by the translators.

Patrick Donnelly, one of the people who saw the video (and my request for an edit) did it and commented below  with a link to an english-only version of my talk (the intro and questions part were left untouched at my request). Here it is for those who need it :


And here is the original, unedited version of my talk I gave, enjoy it!

Ps: The video I tried to show to the audience (around 6:30) which did not work, was this one : http://www.youtube.com/watch?v=20ClL3mL8Gc

And here are the slides used during the talk, in PDF format : http://people.collabora.co.uk/~kakaroto/expolibre-2011.pdf 


KaKaRoTo


GStreamer Conference 2011 videos

The videos of the presentations given at the GStreamer Conference from last month in Prague are finally available online! So if you missed the conference, you can still catch all the interesting talks on video. Thanks to the great work of Ubicast who used a GStreamer-based system for capturing the videos and slides, and it looks awesome!

I gave a presentation in which I introduced two libraries : GstFilters and FsUtils.

Both libraries are  convenience libraries that sit on top of Gstreamer and Farstream respectively, and they should make your lives much easier. I discussed them a bit before in a blog post, but now you can see the full talk with all the details and explanation.

Here’s a link to the conference talks : http://gstconf.ubicast.tv/channels/#conferences2011 

And a link to my presentation about GstFilters and FsUtils : http://gstconf.ubicast.tv/videos/gstreamer-and-farsight/ 


Network emulator tool for Linux

I have finally decided to blog about my netem tool that I wrote a couple of months ago.
First, the introductions, netem is a kernel component for controlling QoS, rate control and various network properties that allows you to emulate a network by modifying the kernel’s IP stack’s queue disciplines. You can read more about it here : http://www.linuxfoundation.org/collaborate/workgroups/networking/netem

The issue I had with the netem queue was that it was hard/complicated to use and required a fair bit of reading and understanding of how the Linux IP stack worked in order to even use it properly. I needed an easy to use tool in order to test multiple network properties quickly. I looked around for a tool that would help me with that and only found phpnetemgui which is a very old piece of code, not even compatible with the latest php versions and which requires you to run a server on localhost and give sudo access to the web server… I didn’t like that, so I wrote my own tool for easy netem configuration (thanks to the phpnetemgui code, it was helpful in providing some of the commands).

You can find my netem tool here : http://cgit.collabora.com/git/user/kakaroto/netem.git/

The README has all the information you need in order to use it, so make sure you read it, but let me summarize a bit how it works.
Netem uses a CSV file in which you can set multiple rules, each with its own set of properties (10% packet loss, 5% duplicated packets, 100ms delay with 25ms of jitter, limit bandwidth to 256Kbps, etc..). Each rule has a name and you can have multiple rules with the same name (limit bandwidth to 256Kbps for IP 1.2.3.4, and 512Kbps to IP 1.2.3.5). All these sub-rules with the same name will be considered as being a single rule. You can run netem on an interface, giving it the CSV filename and the name of the rule that you want to activate and it will output all the commands you need to execute in order to emulate the network as specified in the rules from the CSV file.

To actually run the network emulation, just pipe the output to ‘sh’, for example : ./netem eth0 my_rules.csv 256kbps | sudo sh

The reason I did this was to help my colleague Olivier Crete who was working on TFRC (Tcp-Friendly Rate Control) for RTP in Farsight. He needed to be able to emulate various network configurations, change the bandwidth limitations, introduce packet drop, etc.. and see how TFRC would react to make sure that the video/audio stream’s quality stays acceptable and the bitrate calculation adapts correctly to changing network conditions. I’ve also been recently working on HLS (HTTP Live Streaming) support in GStreamer and I’ve used the tool to make sure that the HLS stream correctly adapts to the network bandwidth and switches the bitrate/resolution correctly. This tool has been a great help in doing all these tests, so it’s time now to share it with whoever it might interest.

I’ll conclude with these example outputs for three different rules (taken from the provided test.csv in git) :

  • Limit inbound and outbound bandwidth to 1024Kbps (2 sub-rules)

kakaroto@kakaroto:~/coding/netem$ ./netem wlan0 test.csv 1024kbps
modprobe ifb
ip link set dev ifb0 up
tc qdisc del dev wlan0 ingress
tc qdisc add dev wlan0 ingress
tc filter add dev wlan0 parent ffff: protocol ip u32 match u32 0 0 flowid 1:1 action mirred egress redirect dev ifb0
tc qdisc del dev ifb0 root
tc qdisc add dev ifb0 root handle 1: prio bands 10
tc qdisc del dev wlan0 root
tc qdisc add dev wlan0 root handle 1: prio bands 10
tc qdisc add dev ifb0 parent 1:1 handle 10: htb default 1
tc class add dev ifb0 parent 10: classid 0:1 htb rate 1024kbit ceil 1024kbit burst 0 cburst 0
tc qdisc add dev wlan0 parent 1:1 handle 10: htb default 1
tc class add dev wlan0 parent 10: classid 0:1 htb rate 1024kbit ceil 1024kbit burst 0 cburst 0
tc filter add dev wlan0 protocol ip parent 1:0 prio 1 u32 match ip src 0.0.0.0/0 match ip dst 0.0.0.0/0 flowid 10:1
tc filter add dev ifb0 protocol ip parent 1:0 prio 1 u32 match ip src 0.0.0.0/0 match ip dst 0.0.0.0/0 flowid 10:1

  • A rule to add 100ms of delay with 25ms of jitter using a normal distribution with 25% of correlation

kakaroto@kakaroto:~/coding/netem$ ./netem wlan0 test.csv delay
tc qdisc del dev wlan0 root
tc qdisc add dev wlan0 root handle 1: prio bands 10
tc qdisc add dev wlan0 parent 1:1 handle 10: netem delay 100ms 25ms 25% distribution normal
tc filter add dev wlan0 protocol ip parent 1:0 prio 1 u32 match ip src 0.0.0.0/0 match ip dst 0.0.0.0/0 flowid 10:1

  • A rule that emulates various packet loss, delay, duplication, packet reordering, rate control, for both inbound and outbound connection with IP and port matching (3 sub-rules)

kakaroto@kakaroto:~/coding/netem$ ./netem wlan0 test.csv test1
modprobe ifb
ip link set dev ifb0 up
tc qdisc del dev wlan0 ingress
tc qdisc add dev wlan0 ingress
tc filter add dev wlan0 parent ffff: protocol ip u32 match u32 0 0 flowid 1:1 action mirred egress redirect dev ifb0
tc qdisc del dev ifb0 root
tc qdisc add dev ifb0 root handle 1: prio bands 10
tc qdisc del dev wlan0 root
tc qdisc add dev wlan0 root handle 1: prio bands 10
tc qdisc add dev wlan0 parent 1:1 handle 10: htb default 1
tc class add dev wlan0 parent 10: classid 0:1 htb rate 256kbit ceil 256kbit burst 0 cburst 0
tc qdisc add dev wlan0 parent 10:1 handle 11: netem loss 0.5% 25% duplicate 5% delay 100ms 50ms 25% distribution pareto reorder 1% limit 1000
tc qdisc add dev wlan0 parent 1:2 handle 20: netem loss 0.5% 50% limit 1000
tc qdisc add dev ifb0 parent 1:1 handle 10: netem loss 5% reorder 5% limit 1000
tc filter add dev wlan0 protocol ip parent 1:0 prio 1 u32 match ip dst 1.2.3.4/32 match ip dport 1234 0xffff flowid 10:1
tc filter add dev wlan0 protocol ip parent 1:0 prio 2 u32 match ip sport 4321 0xffff flowid 10:1
tc qdisc add dev wlan0 parent 1:3 handle 30: pfifo
tc filter add dev wlan0 protocol ip parent 1:0 prio 3 u32 match ip src 0.0.0.0/0 match ip dst 0.0.0.0/0 flowid 30:3
tc filter add dev ifb0 protocol ip parent 1:0 prio 1 u32 match ip src 1.2.3.4/32 match ip sport 1234 0xffff flowid 10:1
tc qdisc add dev ifb0 parent 1:2 handle 20: pfifo
tc filter add dev ifb0 protocol ip parent 1:0 prio 2 u32 match ip src 0.0.0.0/0 match ip dst 0.0.0.0/0 flowid 20:2

Libnice 0.1.0 released!

Yesterday, I released a new version of Libnice, This is a new major version that has a small API/ABI break from previous versions.

Here are the main changes :

  • Added nice_candidate_copy to the public API
  • Make stun_timer timeouts configurable (Breaks API and ABI)
  • Add compatibility support for MSOC 2007 and MSOC 2007 R2
  • Add MS-TURN support for MSOC
  • Added and completed TURN RFC 5766 support
  • Add a nice_agent_set_port_range API to force a component to use a specific port range
  • Fix various bugs and memory leaks
  • Improved documentation

The API and ABI break is with the StunTimer usage, so if you use it, you’ll need to do a small change to your code. Because the library version changed, you’ll also need to recompile your applications that link with libnice.

The biggest change in this version is the full support for the recently published RFC 5766 TURN standard (UDP and TCP) as well as the addition of MS Office Communicator compatibility. The API/ABI break introduced in the StunTimer usage is to allow specifying the timeout of STUN retransmissions. The timeout for the STUN and TURN discovery during the candidate gathering phase has also been lowered to 3 seconds now instead of the 9 second timeout that we had before, which should make for a quicker candidate gathering phase and a more responsive UI.

Another interesting change is the addition of the nice_agent_set_port_range API that allows you to specify a range of ports that you want a component to listen to for host candidates. This should help those who use port forwarding with symmetric NATs.

The stun_usage_timer configurable timeout as well as the nice_agent_set_port_range addition were suggested by Tom Kaminski.
The MSOC support was added by Jakub Adam.
The RFC 5766 TURN support was added by Marcus Lundblad and myself.
Other small fixes that were reported on the libnice mailing list were also fixed and included in this version.
Thanks to everyone who contributed in this release and thanks to Collabora and Nokia for sponsoring that work!

A new version of Farsight2 has also been released today (0.0.23) which should work with the new API of this Libnice release.

You can download this new version of Libnice from the usual place.

Enjoy!

Youness.

GStreamer: GstFilters to be (hopefully) merged into gst-plugins-base

Today is the day of the Gstreamer Conference 2010 in Cambridge. Unfortunately, I couldn’t attend, but I thought I’d share a little something about the things I’ve done on GStreamer, as part of my work for Collabora.

If you remember my last post about Fsu, I talked about how you could use the FsuFilterManager and FsuFilter  classes to create some really cool GStreamer applications that can modify the pipeline dynamically, using a minimum amount of code and a very easy to use API. There was a lot of interest to this during last GUADEC and I decided to move the code from Farsight into Gstreamer itself. The FsuFilter* objects are independent of Farsight, and can be useful to a lot of people, so there was no reason to keep them there.

I have ported the code from Farsight into gst-plugins-base and renamed the FsuFilter* classes into GstFilter* and made it into a libgstfilters library. I opened a bug report on Gnome’s bugzilla asking for my branch to be merged into gst-plugins-base. I would appreciate it if everyone interested in this could have a look, review the code if possible, mainly review the API and try to use it. I’d like to make sure that the API is stable, feature complete and easy to use for everyone, so if you have any complaints about it, feel free to comment on the bugzilla so I can fix it and hopefully get cleaner/better code merged upstream soon!

You can find the built gtk-doc of the GstFilters library here.

Update: To clear any possible misunderstandings, the GstFilters library hasn’t been accepted yet into gst-plugins-base. So far, I’ve only opened a bug report and hopefully, after it gets reviewed, it might get accepted into -base (or not). I’d just like to get people to comment on the API and help me improve it.

Thanks.