Exploiting Intel’s Management Engine – Part 3: USB hijacking (INTEL-SA-00086)

In mid-November, a little over two four nine months ago, I wrote Part 1 and Part 2 of my series of articles about exploiting the Intel ME. I also said I’d write Part 3 by the end of the week. Oops.

Unfortunately, a lot of stuff happened, life caught up to me, then I became busy with another hobby, and then extremely busy with starting a new business of mine (a D&D Game hosting service for Foundry Virtual Tabletop). I’ve wanted to finish my third article for a while now, and I’m taking the time to do it today, though it might not be as verbose as usual because my time is very limited lately (also, it’s been so long, my memory of everything I did isn’t as fresh as I’d want it to be). Me finding a new hobby around D&D gaming and now working on my new business venture is what prompted me to start these articles in the first place, since I knew I wouldn’t have any more time to actually finish this project I started so long ago, so here’s everything I did so far, maybe someone else will finish it.

The big question when it comes to getting code execution on the Intel ME might be “Why?” Well, I thought it would be fun to try and create a keylogger that runs directly on the ME. Not many people know this, but one of the first things I did as a script kiddie was play around with keyloggers. While they have the “steal your friend’s passwords” use, I had one installed on my own PC and it was extremely useful for recovering content I’d write (before text editors or email apps had auto-save features) or using it as a log of what I did and when I did it.

How to keylog? The basics.

How can we use the ME to keylog a machine? The answer is simple, we hijack the USB controller; hence the title of this article!

We need to go back to the PT research Black Hat slides, but not the same ones I mentioned in my previous articles, not the Black Hat Europe 2017 slides, but the Black Hat Asia 2019 ones about Intel VISA (Visualization of Internal Signals Architecture).

In it, Mark Ermolov and Maxim Goryachi talk about the IOSF, the Intel On-chip System Fabric (I briefly mentioned it in Part 2) and explain that it’s used to interconnect all the IP units (USB controller, Graphics card, SATA controller, Audio controller, Ethernet adapter, etc..) of the PCH to each other.

I’m fairly certain (though not 100% sure) that the way it works is that everything is connected to the IOSF, and the IOSF decides which IP unit actually appears to be connected to what, based on their access permissions. So when you talk over the PCI bus to a device, the PCI bridge will simply proxy everything to the IOSF Primary by specifying the Dest ID based on the PCI BDF (Bus/Device/Function), so it uses the IOSF bus internally instead of an actual PCI bus. The whole thing is managed with a permission/identification system called SAI which allows the IOSF to filter the requests and redirect them accordingly.

See the following interesting tidbits from PT’s slides (IP in this context means an Intellectual Property unit):

Page 33 of Intel VISA: Through the Rabbit Hole
Page 34 of Intel VISA: Through the Rabbit Hole

That’s for the IOSF Primary, but there’s also the IOSF Sideband. My understanding of it is that everything is connected to the IOSF via the sideband too and it can be used to bypass the entire bus routes by specifying what device you want to communicate with. I’m not entirely sure yet on the exact differences between the IOSF primary and the sideband, but that’s what we used before in order to enable Red JTAG Unlock on the Dfx-Aggregator device and enable DCI on the DCI device.

Page 35 of Intel VISA: Through the Rabbit Hole

Knowing all that, we can start to poke at the USB device using its Sideband channel.

Woah there, slow down!

Ok! Maybe we can’t start right away, because we have no idea how to do any of that, just yet. I don’t want to explain however how I got to that point because it’s long and boring. The summary though is that I dumped all the addresses from the MMIO ranges that the BUP module had access to, then tried to find some patterns there. I did find a table that contained addresses, and after a while, with a lot of trial and error and some poking at the BUP code, I figured that at address 0xF00A9000 was the “ATT Bridge” that PT mentioned which has tables for mapping local addresses to a sideband channel. I have also figured out (with help from others, as always) that the format of those configuration channels are :

OffsetSizeBitsDescription
0x004MMIO address used to access the SB channel
0x044Size of the SB window
0x084Control flags (bit 0= enabled, bit 1= locked)
0x0C12unused as far as I can see
0x184Sideband channel
0-7Sideband Port ID (0x84 = Dfx-Agg device)
8-15Read opcode (6 = Read Private Configuration Space)
16-23Write opcode (7 = Read Private Configuration Space)
24-27BAR
28posted
29not sure
0x1C4Sideband access type
0-2Function ID
3-7Device ID
8-15Root space (0 = Main CPU, 1 = CSME)

I’ve already explained the format of the ‘Sideband channel’ in my Part 2 article, that was where the 0x70684 magic value was which was used for accessing the Dfx-Agg device (port 0x84, read opcode 6, write opcode 7).

We are also going to need to know what the Port ID for the USB controller (called the XHCI controller) is. For Skylake, it’s easy, it was in the datasheet I mentioned before, but for Apollolake, I had to brute force all the ports and try to figure out what their content was for. Eventually, I had port 0xa2 for APL, and 0xe6 for SKL.

Another thing to note, the main CPU has to be booted for this to work, otherwise the XHCI controller is not powered and doesn’t respond to any requests. I had also spent a lot of time understanding and poking at the memory segments/paging to understand how the CSME memory space is organized. I won’t bore you with that either, but I wrote scripts to dump the segment list and paging information, you will find all of that in my ipclib.

IPCLib?

That’s a little python library I wrote which uses OpenIPC’s ipccli python module. Any time I needed to do something more than once, I wrote it there and used it. There are all sorts of useful functions, but zero documentation. You can call ‘execute_asm‘ and give it a list of instructions and it will run them, you can use ‘print_registers‘ to have it dump all of your registers, use ‘step‘ or ‘stepOver‘ or ‘goUntil‘ to do step by step debugging of the CPU (because the native stepping functions in ipccli had some quirks that made it not work as expected). You should also be using the ‘asm‘ function to decompile code, because if you use OpenIPC’s asm function directly, it will corrupt the registers and things will break when you step back into the code, so I had to back them up before decompiling and restore the registers before continuing. It also has all the bruteforcing methods I wrote as well as the XHCI Controller implementation, but more on that later.

I am releasing the code to ipclib under the GPL license and it’s available on my github. Releasing this is a big part of today’s article as well.

The best thing to do with it though is to actually read the various functions available, they can be self explanatory (like ‘print_registers‘ or ‘escalate_to_ring0‘, or ‘malloc‘ for example), or can be more obscure. Some of the functions won’t make any sense (like ‘v3_resume‘ for my 3rd attempt at resuming ME execution after the exploit runs) because I used them just to test something at some point and they’ll be completely useless to everyone but I’m not bothering on cleaning up the code or documenting it (lack of time, remember?)… I guess that just makes things more fun for reverse engineers 🙂

Also note that while I’ve explained above how to access the IOSF Sideband mapping in the ATT gasket, there’s also a DRAM mapping region which I won’t bother to explain but in ipclib, you will see it be used, so we can map any DRAM region to access it from the ME, which is pretty cool.

The XHCI Controller

Back to the meat of the subject, the XHCI Controller. Can I hijack it? It turns out the answer is yes… and no… It depends on a few things.

On Apollolake, it’s easy, I can use the sideband channel to read from the USB controller, and write to its registers. I had to read the XHCI specification and write my own XHCI controller driver in python, basing it off the coreboot and seabios implementations. I can do things such as :

  • Reset/Initialize the USB controller
  • Enumerate the devices
  • Send commands and receives events from the USB controller
  • Assign a device ID for the usb devices

I didn’t get further than that due to lack of time, but it’s a simple matter of finishing my XHCI Controller (basically rewriting the coreboot implementation in python), then I would have been able to even transfer files from/to the USB flash drives I had connected to the Gigabyte Brix for testing. It’s not much, but at least I was able to see which ones were USB 2 or USB 3 and communicate with them.

On Skylake unfortunately, I was unable to access the XHCI controller via the sideband. You can see my discussion about this on https://github.com/ptresearch/IntelTXE-PoC/issues/12

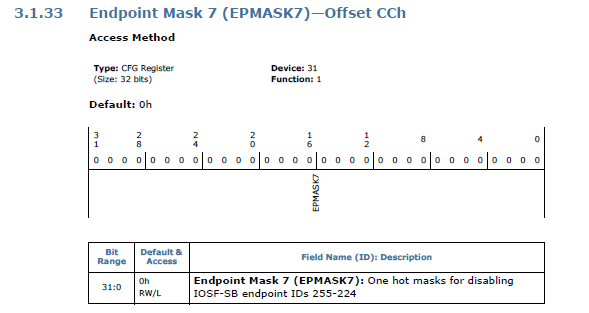
As you could read from the issue linked to above, I originally thought that it was the EPMASK that was preventing access to the XHCI controller by entirely disabling the endpoint :

EPMASK7 definition

Eventually, I figured that it was the CP, RAC and WAC access policies that were preventing the ME from communicating with the XHCI controller via the Sideband channel.

Description of the Security CP register on Apollolake

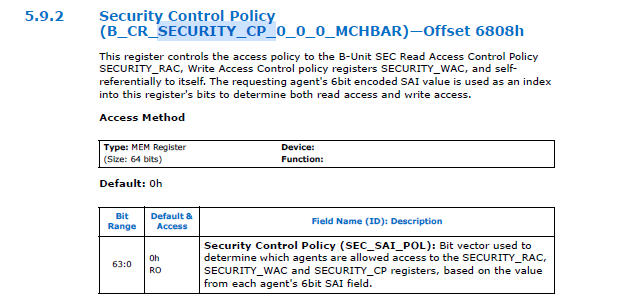
The CP, RAC and WAC are registers that define which SAI agents (which other IP units connected to the IOSF fabric) can access the registers of the sideband. CP is “Control Policy” and defines which SAI agents can read and write the CP, RAC and WAC registers themselves. RAC is “Read Access Control” and defines which SAI agents can read the registers of the unit, while WAC is “Write Access Control” and defines which agents can write to its registers.

And the reason I know that the access control is based on the CP, RAC and WAC rather than EPMASK is because when I try to read the registers of the controller using the JTAG interface (the Tap2IOSF stateport device), it works, but more than that, when trying to read the private configuration space, I’m able to read most of it, but a small region is simply not responding to my reads, indicating that access is blocked for a specific portion of the registers, and that means those are the CP, RAC and WAC registers. It also means that while the Tap2IOSF device has read/write access, it does not have CP access which is why it can’t read those access control registers.

Since we now know that the CSME doesn’t have CP or RAC access to the XHCI Controller registers, here’s a question, does it have write access? And the answer is YES! It’s funny, while we can’t read any of the registers, we can write to them without problem (which re-confirms the assumption about CP/RAC/WAC). It’s unfortunate though that PT were mistaken when they said the CSME has a full privileged SAI to access all the devices, it’s just that its SAI agent value has broader permissions, but as we can see for Skylake, the USB controller doesn’t let the ME read any of its registers, so we can’t send commands and receive events from it. To be fair though, I think the ME does have full privileged access but I think the ME removes some of its own privileges during boot, so PT were probably right anyway. It’s unfortunately the same situation with the SATA controller too, and it might be affecting other devices as well.

How to keylog, really.

Now that we can talk to the USB controller, how can we create our keylogger? That’s of course, for Apollolake, since Skylake is challenging in a different way.

First of all, when the main CPU sets the BARs and configures the XHCI Controller’s PCI configuration space, the ME can store those values, change them so the ME is actually the one communicating with the controller and it can proxy all the commands and data back and forth between the main CPU and the controller. Basically, a Man-in-the-middle attack on the USB controller, allowing it to both monitor everything that passes through USB (including keyboard and mouse of course) and store it elsewhere (perhaps on the hard drive itself since it should be relatively easy to do the same thing with the SATA controller and control it from the ME… or it could save it in RAM and periodically send it over the network since the ME also has access to the ethernet adapter). It could also be used to emulate keystrokes, which could be fun.

To explain that further, basically once the OS has booted, it configures the XHCI Controller on the PCI bus so that it can send commands to it though a command buffer by writing the commands to an area of the RAM, and when an event happens (data becomes available) from USB, the event is written in the RAM by the XHCI controller so the main CPU can read it though the event ring, and then it can read the data transferred to/from USB through the transfer ring.

See this image (From page 57 of Intels’ xHCI document) which shows the general architecture of the communication with the XHCI controller :

General Architecture of the XHCI Interface

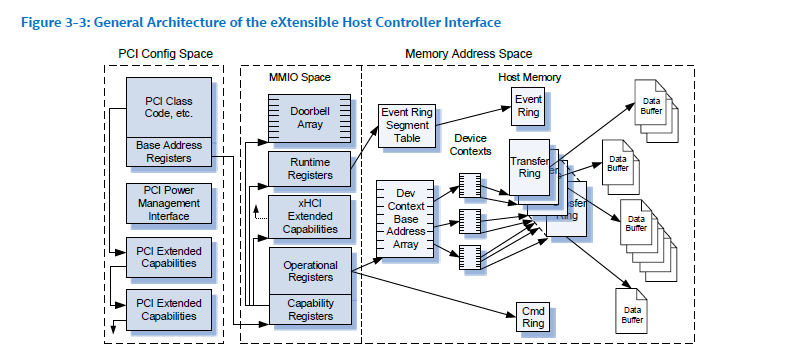
As you can see the Cmd Ring, Event Ring, Transfer Ring and all the Data Buffers are in the Host Memory, and the configuration of where they are is stored in the MMIO Space that is set in the PCI configuration space.

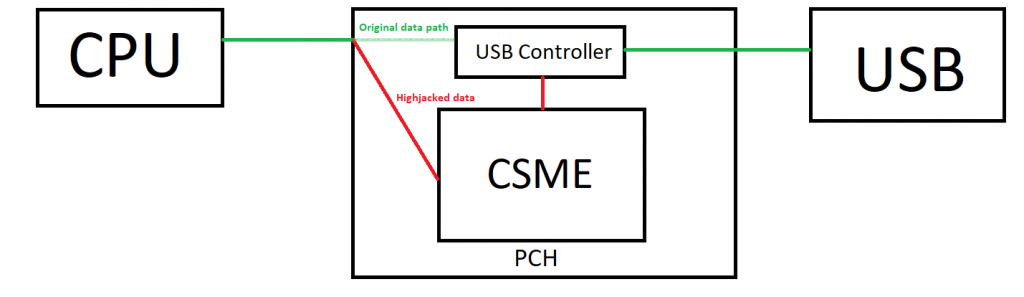
To hijack the USB, the CSME just needs to wait for the OS to boot, then it would change the configuration from the MMIO registers that the OS has set in such a way that sending commands does not do anything anymore (since the xHCI controller isn’t looking at that Cmd Ring anymore), but instead, the CSME would be the one reading the RAM, deciding if it wants to forward the command, modify it, save information from it, etc.. then writing the same (or modified) command in the actual Cmd Ring that the xHCI controller is listening to. When an event or data is received, The CSME would copy that data over to the Event Ring or Data Ring that the OS has set up. And there you go, we have full control over the USB interface with our CSME in the middle attack!

Here’s a badly drawn (my art skills are amazing!) diagram showing how the Man in the Middle attack works :

CSME in the Middle

An alternative solution would be not to change any of the PCI configuration, but simply look for the command, event and transfer rings of the XHCI controller as set up by the main OS and monitor their contents directly since we can map any DRAM region to access it from the ME. By doing that, we would have less of an impact on the main CPU, with no risk of potentially decreasing the performance (especially when it comes to USB flash drive transfers), but we’d need to be able to receive interrupts from the controller. I’m not so good when it comes to interrupts, so I don’t know how that would work.

How about Skylake ?

Skylake (and Kabylake as well actually) are different because we can’t read the registers from the XHCI controller, so we can’t save the actual RAM addresses that the Host is sending command to, but since we can write to the MMIO registers, we can still do a lot of mischief. I actually had a little fun resetting the controller while the OS is booted and it caused all USB devices to stop working. I also did that on the SATA controller and all hard drives stopped responding… a lot of fun, and more of a malicious virus behavior than my original keylogger plan.

Note that I never got around to actually writing the code as a binary to run on the ME, which was ultimately my plan, which is why I’m mentioning the issue with SKL/KBL. But if I were to do the keylogger entirely using IPC commands over JTAG, then it wouldn’t be a problem since we can read from the XHCI controller via Tap2IOSF. The code I wrote in ipclib for it was mostly just a playground to test and see how it could be done from within the ME itself and I’ve confirmed that anything I’ve done so far would work exactly the same if it were executed from the ME firmware itself.

But all hope isn’t lost for getting it to work on Skylake, there are a few options still available :

  • We could try to find who sets the initial permissions on the USB controller as it boots (is it hardcoded in the silicon? is the ME itself setting it when it turns the power on? Or perhaps it’s configured in the PMC (Power Management Controller) or some other device) and it can be configured to give full access to the CSME’s SAI.
  • Instead of using the sideband channel, we could use the IOSF Primary bus directly, there’s a possibility that we could have access to it fully that.
  • We can perhaps read the registers by using the Tap2IOSF device if the ME is able to communicate with it directly and ask it to read the IOSF for us, emulating the commands sent via JTAG, which do actually work for reading even on SKL and KBL.
  • We can maybe scan the RAM to find the command/event/transfer ring buffers that the OS allocated and use them without having to read their values from the PCI configuration space
  • Maybe map those registers to another address by using another SAI, perhaps a subsystem of the ME or another device could have access to it (isn’t DMA doable from one PCI device to another for example?).

I’m sure that other ideas can be found and this problem can be circumvented. Unfortunately, as I said before, I don’t have time of my own to pursue this further, so perhaps someone else will.

Update from five months later: Well, I’m glad I delayed posting this since I actually see a different solution now. Thanks to Intel’s own CVE 2019-0090 whitepaper available here : https://www.intel.com/content/dam/www/public/us/en/security-advisory/documents/cve-2019-0090-whitepaper.pdf

On page 5, you’ll find this diagram that shows how the CSME sits between the CPU and USB and can communicate with it via the Sideband Fabric.

They also explain how the CSME takes care of loading FW onto the various IPs and it controls the IOMMU unit which checks for the SAI authorization. The CVE is about an exploit where someone could write to the ME’s SRAM before IOMMU is enabled, because SAI is not checked while IOMMU is disabled.

Explanation about CSME, IP, SAI and IOMMU

So, my new idea would be : Can we disable IOMMU? Since the ME controls it and is the one to enable it, then we should be able to disable it, then we would get to ignore SAI and get full access to the xHCI on Skylake without having to use a different method than what I have already built.

This also tells me that at some point, the ME does have access to it, then writes the firmware to it, then locks things up, so we could also try to find where it does that and patch that code to prevent it from happening. This is kind of like my alternate solution #1 above, but this new information seems to indicate that it’s the ME that handles it, and in the RBE module as well.

Let’s do this!

Alright, enough rambling. Let’s go ahead and get you all to reproduce what I did with step by step instructions.

Step 1 – Hardware setup

That’s easy, you first need to enable the exploit and get code execution with OpenIPC working for your machine. Either using the IntelTXE PoC code from PT if you’re using Apollolake, or using my instructions from my previous articles if on Skylake or Kabylake.

Step 2 – Software Setup

This should also be easy, you mostly need to have Intel System Studio installed and patched as explained in the IntelTXE PoC repository or my previous articles. Then get my ipclib code and import it into your ipython console with from ipclib import *

Step 3 – USB Listing (Apollolake)

If you’re on Apollolake, we can read/write to all the registers, and the xhci implementation I wrote is in the xhci object. You can poke at it in different ways, but to disrupt USB while the system is booted, in ipython ipc console, simply call :
xhci.reset()

To setup USB, reset ports and set addresses to the USB devices :
xhci.setup()

It should list the ports that are in use and show if they are USB 2 or USB 3 devices, though that’s the extent of it as the implementation was never finished.

Step 3 – USB Reset (Skylake/Kabylake)

If you are on Skylake or Kabylake, we can only write, but not read any of the registers, so using the xhci object’s methods will not work here as most of them try to read the status registers.

We can however do this simple write command :
xhci.bar_write32(0x80, 0x2)

which will enable the reset bit on the command register. This will reset the USB controller and prevent the OS from accessing devices. This means that your keyboard and mouse on the target machine will stop working immediately after doing that command, proving it works.

A little extra mischief

As I’ve poked at all sorts of PCI devices during my testing, I also did manage to disrupt the SATA controller when I wanted to. It’s the same principle as with USB though there is no SATA object to use.

The following commands should disable the SATA controller on Apollolake :

addr, _ = setup_sideband_channel(0x150100b5, rs=0, fid=0x90)
t.mem(phys(addr + 4), 4, 1)

And here is the command to use on Skylake and Kabylake, using the correct Sideband channel :

addr, _ = setup_sideband_channel(0x150100d9, rs=0, fid=0xb8)
t.mem(phys(addr + 4), 4, 1)

You can test it by booting the machine onto a linux system and doing dd if=/dev/sda bs=256 count=1 | hexdump -C to verify that the SATA device can be read (assuming /dev/sda is a SATA drive), then doing it again after running that command through JTAG to confirm that you get an Input/Output error.

If you’re looking for an explanation, then here’s what the command does :

In the case of kabylake, the fid=0xb8 is the function id where bits [7:3] are the PCI device id, and bits [2:0] are the function id, so 0xb8 means PCI device 23.0 which is the SATA device. The rootspace is 0 meaning the main CPU root space, and the sideband channel 0x150100d9 means :
bit 28 : posted (for writes)
bits 27-24: bar 5 (AHCI)
bits 23-16: write opcode 1 : WriteBar
bits 15-8: read opcode 0 : ReadBar
bits 7-0: Port ID 0xD9

Writing at the address + 4 is the AHCI register control, and writing bit 0 to 1 means reset controller.

As “simple” as that.

Conclusion

That’s it! That was the last of my series of articles. I’m sure there’s a lot more stuff I could write about on how I got to that point, but it’s all very tedious and boring (the proof that it’s boring is that I don’t remember most of it). You can probably figure some of the stuff out from the ipclib code that is in there.

I unfortunately never got around to doing my ‘antivirus-immune keylogger’, but it’s not impossible. It turned out that it needed a lot more work than I originally thought it would, and I blame it all on Intel for not providing documentation. I’m sure it could have been done in one week if I didn’t have to spend a year trying to understand how any of the underlying architecture works.

I’m sure there are a lot of other useful applications that can be done by running your own code in the ME. I’ve only done it using IPC scripts, but it should be possible to run binary executables (I know that PT did in their original exploit).

This whole experience was fun. More complex than I ever thought it would be, but still, a lot of fun. It also shows how dangerous the ME can be if someone hijacks it to run their own malicious firmware on it. The possibilities of having ME-viruses are huge, and it shows the importance of having good security and locking access to your flash chips if possible.

With this last article, I close the saga of the Intel ME reverse engineering and security research I’ve done in the last couple of years. I might still poke at it at some point, but I’m concentrating on other stuff for now, with my new business building a hosting service for D&D games being the focus of all my work. I hope the ipclib release I’m doing as well as these articles will be interesting to others and you’ll find something useful in it and perhaps it will inspire others to poke at things that weren’t really meant to be poked at.

It was fun, thanks for reading, and considering everything that’s happening in the world, stay safe!

PSFreedom news, homebrew and donations

Hi all,

I suppose many people are now following my blog and you’re all eager to learn more about the latest PSFreedom news!

Important things first : Please stop asking me if PSFreedom will work on your phone, NO it will not work on any Symbian phones and it won’t work on iPhones (see next paragraph though). Stop asking and just accept that and buy yourself a Teensy board or an AT90USB microcontroller or similar and install PSGroove on it, then you’ll have your own dedicated dongle.

Now that that’s out of the way, let’s get back to business! I told you last time that NTAuthority almost had the iPhoneLinux port working, well the good news is that it does indeed work and it’s been released! Please read the instructions to get it installed from the wiki. Note however that it only works on iPod Touch 1G, iPhone 2G and iPhone 3G, it will not work on iPhone 3GS or 4G or any other iPod… so please don’t even ask about it!!!!

In similar news, we’ve added support for many new Android devices, the list almost reaches 40 models, and about 25 unique devices are now PSFreedom compatible! Again, you can see the whole list of supported devices in the wiki. I just want to make one thing clear : I made PSFreedom for the N800/N810/N900 phones, but I didn’t port it to android. Although I helped some developers port PSFreedom to new USB controllers, I didn’t port or compile any build of PSFreedom for any Android device, so your thanks should go to those responsible for doing it. This is a community effort and those from the community who helped this project should receive our thanks!

Now, what you’ve been waiting for, what’s new in the  PS3 scene, well, many things. First, I’ve recently joined the group of Mathieulh and I’ve been working with them to figure out how the kernel and payload works! I’ve also recently created a new branch in git for writing custom assembly for the payloads instead of using the hardcoded binary blob from PSJailbreak. I’ve cleaned up the payload used by PSJailbreak as well as documented it so others can read it and better understand how it works. The reverse engineering and information has been provided by the group of Mathieulh as well as some of my own reverse engineering work. You can find the ASM payload file here. AerialX from the PSGroove team is also working on cool payloads so you should check out his git repository too!

Also, Matsy and I have reverse engineered the xRegistry.sys file format and are now able to modify the XMB registry in order to enable new features (QA mode, debug options, etc..), and we’ll be working in the next few days on making a homebrew application that would allow you to change these settings safely.

Now for the sad news.. I will be forced to update my PS3 system very soon, for multiple reasons.. First, I’m getting the PS Move tomorrow and I really want to buy Tumble (PSN game) which looks like an awesome game and I can’t do that if I don’t upgrade my PS3 since PSN is locked for firmware 3.41. I also am a PSN+ subscriber and not being able to connect to PSN and enjoy the content I paid for is absurd and it feels like it’s wasting those 50$ I paid for PSN+. Finally, I had to reformat (and restore from backup, Thank God) my PS3 hardrive yesterday because as I was testing the payloads, I kept crashing the PS3 and I kept shutting it down the hard way which seemed to have corrupted my hard drive. After I restored my backup, all my content is there, but when I try to launch a game it says “To access this content, you must active this system. Go to ‘Playstation Network->Account Management’ to activate this system”, which I cannot do without connecting to PSN. This basically means that the 50+ games that I have bought on PSN are now inaccessible to me. So for all these reasons, I have chosen to update my PS3 to the latest firmware version.

As you all know by now, Sony has fixed the vulnerability we’re using to run homebrew in the latest firmware update, which means that once I update, I won’t be able to use PSFreedom or run homebrew applications anymore. This means that I won’t be able to work anymore on homebrew and custom payloads.. I could try to write something but I won’t be able to use it or test it, so the motivation will not be the same. For that, I’m asking you, those of you who used and enjoyed PSFreedom and are grateful for it or those who would like to see more of my work in the future, that you please donate a little something. Your donation will be used in order to buy a new PS3 that will be used only for homebrew and development. Note that I am not requesting you to donate, you have no obligations to do so and I’m not promising you anything either in exchange for a donation. Also note that, as stated earlier, I do not make ports of PSFreedom to new devices/phones, so don’t hope or expect me to make it work for your phone because you donated something. So only donate to me if you are grateful for everything I’ve done so far and you want to show your appreciation. If you decide to donate to me, then thank you very much! Your donations are very much appreciated and they might allow me to release something cool and useful to the PS3 homebrew scene in the future (but I can’t guarantee anything to anyone of course).

So if you want to donate some money, just click on the Donate button below! If you want to donate some hardware (a PS3 maybe, or a Teensy board or anything), contact me and let me know.

Thank you all for your support!
KaKaRoTo

PSFreedom 1.0 and lots of news!

Hi all,

I’ve wanted to post about PSFreedom for the last 4 days now but everytime there’s something that prevents me from doing so.. there is so much happening that it’s hard to keep up and I’ve been overwhelmed by the reaction!

PSFreedom has seen a tremendous success, it’s been featured on multiple news sites  including Engadget, we’ve had a huge number of ‘fans’ (more like leechers:p) popping up on the newly created IRC channel (#PSFreedom @ irc.freenode.net). Someone (devz3ro) donated a domain and web hosting for our new http://psfreedom.com/wiki website. The number of people who have worked hard to create a beautiful and well organized wiki to keep track of all the ports. The number of  people who have tried (and many succeeded) to port PSFreedom to so many different devices and those who sent me pull requests on github as well as those who simply read my code and reviewed it and decided to comment on my commits so I can improve the code.

Anyways, it has been a tremendous success, real community work and I want to thank personally everyone involved, everyone who helped, whether it be with a small or a big contribution to the project.

Now about the news, I have quite a few… first, a lot of people are asking me how to get this working on the N800 and N810! Well, it’s been working for a few days now, but the mass storage driver was conflicting and made the controller unstable. However, today, drizztbsd contributed a patch that fixes this issue (by killing hald-addon-usb) without modifying any file from your system, so enabling the exploit on the N800, N810 and N900 is all a matter of running the ./psfreedom-enable-maemo.sh script! There is also an easy to use graphical application that should be released today by MohammadAG and a special thank you to Bash who also contributed the PSFreedom logo.

I have also received a ton of requests from people to port this to the iPhone and/or one of their Symbian devices… my answer to that is : RTFM!! In other words, no it is simply *impossible*. It can only be ported to other Linux devices. However, we are close to having it work with IphoneLinux (actually, I just got confirmation a few seconds ago that it’s finally working) as NTAuthority spent countless hours porting it and fixing the controller’s incomplete driver in order to make this work. Once his port is finished, and stable, he will make it available to everyone, so stay tuned and follow the Device compatibility list on the wiki!

Other good news, PSFreedom has been ported to a huge amount of devices already, and the list keeps growing every day! We currently support and have working binaries for not only the N800/N810/N900 but also the Palm Pre, Archos 5 (Generation 6), Archos 5 IMT (Generation 7), as well as, thanks to the work of DocMon in porting PSFreedom to the MSM72K controller, The HTC Desire (Bravo), Nexus One, HTC Dream (G1), HTC Sapphire (HTC Magic 32A/32B), HTC HD2 (running Android), HTC Wildfire and I’ve received confirmation a few minutes ago that it’s been successfully ported to the HTC Evo as well as HTC Diamond. Also, waninkoko recently ported PSFreedom to work on the Dingoo open game console.

For the future, you can expect a lot more devices to be supported, like the iPhone/iPod (Through iPhoneLinux only) as well as the Gp2x Wiz game console, and the huge list of compatible devices available in our wiki. Also note that running the PSFreedom on an Android device isn’t as easy as it is on the N900, you need to flash some nandroid thing, then flash a custom kernel (because Android’s kernel sucks) then run PSFreedom in that environment, then run Nandroid again to restore your system… It is quite complicated but many people are working on making it much simpler to do, the famous AmonRA contacted me and said he started working on building a PSFreedom-compatible recovery image with a menu item to enable/disable the PSFreedom functionality.

There is one last  important bit of news I want to share with you : PSFreedom 1.0 has been released (more like tagged) and it adds support for many devices, the Makefile allows you to build for a specific platform by specifying it as a target, ‘make N900’ or ‘make Desire’ or ‘make Dingoo’ will build it for your needs with the right configuration. Also more importantly, this version will allow you to customize which payload or shellcode you want to send to your PS3 during the exploit. Many people have requested a version that allows you to play backups, while the original release of PSFreedom didn’t allow that, it quickly got patched to allow the backup manager to work. The new release of the PSGroove yesterday also adds 2 system calls that allows user space application to modify the GameOS kernel, and that meant a new payload is available for developers. This version of PSFreedom provides all these payloads and you can choose which one to set by simply copying it to /proc/psfreedom/payload once the module has been loaded. The same also applies to the shellcode.

That’s it for now, there are a ton of other news I’d like to share, but this post is long enough and I’d like to keep some surprises for next time!

Thanks to all for your support!

KaKaRoTo

PSFreedom source code released!

Hi again,

As promised yesterday, I’ve just released the source code for PSFreedom. You can grab it now on github.

If you want to port it to work on another device, then fork the repository and start working, you can send me a pull request once it’s done. See the end of this post for a little howto on porting it to a new device.

I have also decided to remove that video I put yesterday on youtube. I didn’t give the link to anyone, but somehow people found it and it got linked on multiple news sites… that video is useless, hard to watch, and I’m sorry! I’ve made a new video that you can view here :

Since yesterday I’ve been spammed with emails, comments on my blog, PMs and pings on IRC, etc.. and my server even went down (doesn’t seem to be because of high traffic). So I’d like to answer everyone with this FAQ :

Q : What is your relationship with the PSGroove project ?

A: PSGroove was released a while ago while I was already working (about 50% done) on PSFreedom. I had help from Mathieulh and Phire from the PSGroove team, who gave me insight on what the jailbreak does. When PSGroove was released, I read its code to understand what it does and to make sure my code worked in the same way. I copied the descriptors and payload from the code of PSGroove, and I give them credit for what they did, and for what I copied from their project. I set my license to GPL v3 to match theirs, and I gave credits to those who helped me on IRC. However, I say and I insist that PSFreedom is not a port of PSGroove, because I never took their code and ported it to the N900, this is my original work, and I wrote all of its code from scratch. Some of the PSGroove team seem to be in conflict with me because of that, they insist that “if you looked at our code, then it is a without question a port of PSGroove”, and I believe we have two very different understanding of the term ‘port’.

Q : Can/when is it going to work on the iPhone/Symbian/My phone ?

A: PSFreedom is a  Linux driver, so it will only work on Linux-enabled devices.. which means, not on iOS, and not on Symbian, so please stop asking about that!

Q: Will it work on the 770/N800/N810 ?

A: I only did this for the N900, I might port it to other devices, but right now, I cannot give any guarantees to anyone that it will be ported or that it will work on another device… The source code has been released and whoever wants to contribute can go ahead, fork my repository, and send me a pull request when you got something working.

These are linux devices, so yes, it should work, but just like any other device, they use a different controller than the N900, so a little porting will be necessary.

Q: Will it work from a linux PC ?

A: Unfortunately, no, most PCs have a USB controller  that only supports Host mode, but you need Slave mode to be able to make this work.

Q: Can I run backups with this ?

A: At the moment, no, I have used the same payload as PSGroove, which means backups are disabled, although someone already released a version of PSFreedom with backups enabled. In the future, I will hopefully  make the module load any payload at runtime, this way you could choose between different payloads.

Q: Can you make it easier to use ?

A: Me? No.. someone else? Yes.. there is already someone working on a UI for PSFreedom, and it will be available once it’s ready.

Q: What do I need to use PSFreedom on my N900 ?

A: First, you need a N900 (duh) and a PS3 (duh) with firmware 3.41. The N900 should be running the stock kernel (-omap1) not a modified kernel. Then you just need to scp the files to the N900 and run the -enable script.

Q: How much of the source is Nokia N900 specific? Are you using the Linux USB Gadgets library?

A: Very little is N900 specific, I’m using the include/linux/gadget.h if that’s what you mean. See next Q/A for more info.

Q: How hard is it to port it to a new device ?

A: Well, I’ve just separated my code from the N900 specific stuff, so it’s quite easy, there are mainly two functions to write, one to get and one to set the USB address.. two other functions that only return some static result depending on the configuration of the controller (the name of the endpoints, and whether the controller supports high speed or full speed mode).

Read the README file provided with PSFreedom, and check the psfreedom_machine.c file for specifics on what to implement.

Q: How can I port it to a new device.

A: Well, first, you need to figure out what controller your device uses, in the case of the N900, it’s ‘musb’..

Then go to the driver code for that controller (probably in drivers/usb/gadget) and look for ‘SET_ADDRESS’. In the case of musb, it was in drivers/usb/musb/musb_gadget_ep0.c. In there it was setting the address to the USB device, so just copy that code into the psfreedom_machine.c to allow setting the address, and add a similar function to be able to retreive the address.

Then add a function to return 0 or 1 depending on whether the controller supports HIGH, FULL or LOW speed mode (go to usb_gadget_register_driver for your controller, and in the first lines, it should validate the speed argument, it will tell you which ones are acceptable), set LOW speed mode to return TRUE only if FULL speed isn’t available .

Finally, add a function to return the endpoint names.. it will usually be something like ‘epXin’ and ‘epXout’ (where X is the endpoint number), or “epXin-bulk”, etc.. look at how the driver initializes its endpoints or grep for “->name” in the file to find where it sets it…

That should be enough!

Ok this is it for now with the FAQ. Next time, I’ll tell you all about my experience, what problems I encountered and how I fixed them, maybe it will help others!

Enjoy it!

KaKaRoTo

PSFreedom (Jailbreak PS3 with N900) worked, finished and released!

Hi everyone,

As promised, here’s an update on my implementation of the PSJailbreak exploit : IT WORKS!

I made a video to show you, but I suck at making videos, so we can’t really see what’s going…  I’ll do a better one tomorrow.

It’s 9:30 AM here, and I really need to go to sleep, I’ll post more about this tomorrow, and I’ll release the code tomorrow for everyone to enjoy, compile, contribute, read, laugh at, etc…

So here’s the binary release of PSFreedom (thanks to xnt14 for the name) : PSFreedom driver

I would like to thank 3 people in particular who helped me, encouraged me and helped debug with me : NTAuth, philhug and phire (a.k.a phiren) from EFNet.

So here’s how it works.. download the .tar.gz, extract it, copy the files to your n900 (with scp, into /root), then ssh into your N900 and type : ./psfreedom-enable.sh

Then you can follow the usual procedure, unplug the PS3 from power, plug in the N900, connect the power to the PS3, then press power and *quickly* press the eject button… Then just let  the magic happen!

Once you’re done or want to revert back to the normal operation mode of the N900 (or to charge it) run the command ./psfreedom-disable.sh

In the future, we’ll have a nice package to install, a GUI application, I’ll make use of the LEDs  to show you the status of what it’s doing, and i’ll have it auto-revert to mass storage mode, so you can use your N900 not only to enable homebrew but also to store your homebrew!

See you tomorrow! Good night!

KaKaRoTo

Update on PSJailbreak linux kernel (for N900 devices)

Hi all,

For all those who kept bugging me on IRC about “what’s your status” and “when will you release it”, etc.. I’d like to give you a quick status update on my project :

First, this is NOT and I repeat, it’s NOT a port of PSGroove for the N900.. I started my project long before PSGroove was released, and my code has absolutely nothing to do with theirs and we don’t share any code in common. It is NOT a port, it’s a different implementation of the same exploit!
Secondly, it’s going pretty well so far, I finished writing it, all the code is there, and I’m testing it but I’m still getting some issues, for some reason the PS3 isn’t accepting the JIG, I hope I can get this fixed soon, so please, everyone just be patient, I will release it when it’s ready! But the good news is that it’s doable apparently!

For those who read my previous post, here’s an update :

– The kernel OOPS I was getting on linux was because my ‘hub’ was a high speed one, and when a device gets connected, the reply to GetPortStatus ommitted the ‘high speed’ flag in the response.. apparently, a high speed hub can only have high speed devices plugged into it, you can’t plug full speed or low speed devices in a hub, otherwise, your linux kernel crashes! It’s a use case the kernel developers didn’t think of (or didn’t find a way to test it). I will also soon release the code to reproduce that oops so people can look into it.

– I was able to get and set the address on the controller, but I had to add two new functions to the usb-gadget API. This means that you will eventually need to flash your device’s kernel to get advantage of the new functions.

– I figured out how to send a NAK in response to a IN interrupt.. you simply don’t queue anything, the controller apparently takes care of that automatically for you! and I had to read almost all of the controller’s code to figure that one out!

By writing this exploit as a standard linux driver, this means that my module can be used on any other linux-enabled devices.. this means not only the N900, but also the 770, N800, N810, Android phones and future Meego devices. It might need a little porting for some devices though, but it should still work…

That’s it, I’ll keep you informed on how it goes. Hopefully, we’ll soon be able to run homebrew on our PS3 simply by plugging our N900 to it, what a wonderful device it is 🙂

KaKaRoTo

PSJailbreak USB Gadget kernel driver

Hi,

***

For those who don’t want to read a long post, here’s the summary : I’m trying to write a USB gadget driver to make my N900 act as a hub, I don’t know if I can get it to work because the kernel subsystem doesn’t seem to allow me to do it. If someone knows how to get a request’s destination address, or override the usb_gadget_ep0.c SET_ADDRESS, or knows of limitations that would prevent me from making it work, let me know. I also have ‘working code’ for the usb hub now, but it seems that when I simulate a device insertion, my computer’s (not the N900’s) kernel crashes, so I’m a bit stuck.

Read the rest if this article interests you.

***

Some of you already know about the PSJailbreak, for those who don’t, it’s a USB dongle that exploits the PS3 and allows you to run unsigned packages (homebrew).

Some people tried (and some succeeded) to create a ‘cheap’ clone of the dongle by reverse engineering what it does, and rewriting it into some ATMega microcontroller.

My idea was to use an existing programmable linux-based device (my N900) to act as the dongle. So I started looking inside the kernel’s source to understand how I can achieve that. I found that the kernel has a ‘usb gadget’ subsystem for writing gadget drivers (in other words, a driver to make your device act as a slave/peripheral) so I started writing a gadget driver.

I must say it wasn’t an easy task (for someone with ~zero kernel experience) especially considering that the only ‘real’ documentation I found was the undocumented source code of other gadget modules…

Anyways, the PSJailbreak dongle emulates a USB Hub with multiple devices getting connected/disconnected to it, so I tried to write a driver to emulate a USB Hub, I thought that it would be a great idea and useful, since it could be used in order to allow my N900 to be in PCSuite mode *and* mass storage mode at the same time, without having to make that annoying choice everytime I plug it into USB.

Anyways, I first realized that I can’t just insmod/rmmod drivers to emulate a device getting connected/disconnected, because the usb_gadget_register_driver doesn’t allow us to register more than one driver. Ok, makes sense, I can live with that, but this means that I’ll have to modify the kernel to make sure the usb_gadget_register_driver redirects to my hub’s code to simulate the insertion/removal and let my hub driver be the only one registered on the controller. Anyways, for my use case, I thought I can just write all the code for all these ‘virtual devices’ directly into my driver for now.

Second issue I came up with is that the drivers never get a SET_ADDRESS.. that’s handled internally by the kernel (drivers/usb/musb/msub_gadget_ep0.c) which means that even if I say “new device connected”, if the host sends me a SET_ADDRESS, I won’t get it, so I can’t map addresses to my virtual devices… but not only that, but I found no way whatsoever to find what is my current address, or to which address a message is being sent… I suppose it’s all being handled by the usb subsystem.. but I can’t find a “if (destination != self->address) return; anywhere in the code either.. which makes me think that it might be handled by the controller itself.. (since we do receive messages destined to other devices, if we’re connected to a hub, it has to drop those somewhere), but I don’t know, either the controllers don’t let me do what I want, or the kernel’s USB subsystem was never written to allow for USB hubs to be created. I figured that if I could at least simulate a device being connected, I should be able to find out how the kernel would handle the newly received SET_ADDRESS or the requests being received to the virtual device… then maybe I would understand a bit more how to do it and whether or not it’s even possible.

Call it bad luck, but now, whenever I plug my N900 (with my driver module loaded) into my laptop (linux debian, kernel 2.6.32-5), my laptop crashes.. it completely freezes up, the kernel panics, and then I’m forced to reboot it.. I’ve looked at what messages I’m sending/receiving from the N900’s dmesg (yes, the N900 is perfectly fine and doesn’t kernel panic), and I compare it with the USB dump of a generic hub being plugged into the computer, and I see no difference, I’m doing exactly the same! And yet, my kernel segfaults, and now, I’m stuck as I don’t know how to move forward.. I only got a partial stack trace, I know the khubd thread gets the segfault, and that it’s when it’s trying to build a URB…  there also seems to be some error being reported by the power/battery manager or something, so maybe it has something to do with bad/wrong values of self-powered/power needs of the device.. but that’s it…

I went to the #kernel channel on freenode, asked about this issue, asked how to get proper debug/stacktrace, and asked how a usb gadget can know its own address, but noone seems to care/answer/be awake. So that’s why I’m posting this on my blog.. first, to let everyone know what I’m doing and how advanced (or not) I am in the project, but also to ask people for help, if they know of a solution to my problem, let me know in the comments. Please, do not post comments like “I have a PS3/N900/something if you need help testing”… I don’t.

Finally, I’d like to finish by saying that I do not condone piracy. The PSJailbreak is an exploit that jailbreaks the PS3 allowing you to run unsigned code, it opens the door to homebrew and yes, also to piracy, but it’s each individual’s choice to either use it for legal applications or not. It is fair use to be allowed to make backups of your expensive games (and I’ve got about 50+ disc-based games). I’m doing this project only because I like the challenge, I thought it would be a good experience for me to dive a bit into the kernel code, and I found it entertaining. I also wanted to showcase the power of the N900 even more by making it become any usb device I want.. even a PSJailbreak clone, I don’t think anyone has used it in this manner yet.

Thanks for reading!

Update : I got a stacktrace from the kernel crash!

KaKaRoTo